Do you need to line your chimney? Part 2

Do you need to line your chimney?

Building regulations do not say that it is essential to fit a flexible flue liner. If a chimney can be proven to be in good order then you do not have to fit a flexible flue liner.

ChimFit say that to really try and put you off from choosing not to fit a flexible flue liner. A wood burning stove that is designed to work with a 6 inch flue will not perform as well if it were attached to a chimney of 11 inch diameter!

With a flexible flue liner fitted properly, insulated (if required) there should be no reason for a wood burning stove not to perform perfectly.

The only time ChimFit may not recommend chimney liners is if the chimney is new.

Possible problems of deciding not to fit a ChimFit recommended flexible flue liner
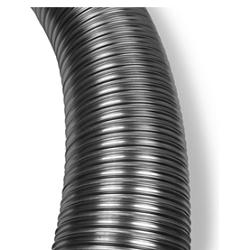
flexible flue liner

1. If the chimney is not in good working order then smoke and harmful Carbon Monoxide can travel into your home, this is very dangerous since Carbon monoxide can kill and does kill. Note: that’s why a Carbon monoxide detector in all bedrooms as well as the room with the stove is highly recommended by ChimFit.

2. Hot air and gas rises – cool it down and it will slow its assent, stop altogether or sink. Hot air or gas does not rise well in cold chimney spaces, especially where heat-stealing space or rough surfaces are in the chimney as they steal heat and slow down the deposits that travel with the gases. These deposits, when slowed, form tar and condensation both of which can damage the innards of the chimney. If smoke slows down too much then the flow of said smoke starts to build up and dams underneath, thus the stove begins to burn inefficiently.

How To Install A Register Plate

Buy-Reg-Plates-Here

1. Fitting a wood burning stove does not require a professional to do the installation, but it is recommended by us at ChimFit. All work must however comply with part J of the building regulations.

2. This is a simple guide from ChimFit on how to install a stainless steel register plate, other heating appliances and flue manufacturers may have different instructions for their products and so, if in doubt, read their instructions where possible.

Install a steel frame to hold the chimney register plate. The register plate’s purpose is to stop loose objects falling from inside the chimney into the fireplace and helps keep the wood burning stove clean as well. Another benefit is that it keeps the flue insulation in place. It closes off the chimney stack and stops any smoke getting back into the room. The register plate must be be made of a non-flammable material and fit round the wood burning stoves flue pipe while blocking off the opening to the chimney stack.

Some people use fire proof board for register plates because it is easy to cut to measure, very light and easy to position. Many people prefer however to buy a pre-cut steel register plate with access panels. Which once again Chimfit can recommend a retailer for; this is useful in case of a requirement to get access to the chimney for cleaning and other needs.

Register plates can be bought from a supplier that Chimfit can recommend. You will need to install a frame or some other means of holding the register plate in place however. The next step is fitting the stove pipe to the top of the wood burning stove. Having measured the distance from the top of the stove (inside of the flue outlet) to a point at least 1 cm above the top of the register plate frame, you can cut the flue liner and the wood burner stove pipe to length.
An adapter is used to join the top of the flue pipe to the bottom of the flexible flue. Sit the flexible liner into the adapter and make sure it is located centrally. Tighten the adapter to hold the liner in position and to secure the adapter to the liner.

register plate

The register plate can now be fitted into the steel frame. The offcut of the stove pipe can be used as a template by drawing a line round it. This circle can be cut out using a jig saw for example. This is done for the two parts of the plate surrounding the stove pipe and straight lengths are fitted to fill any gaps. Fire cement can be bought from Chimfits recommended retailers. Seal the joints and gaps of the register plate with some fire mastic.

Buy-Reg-Plates-Here

Installing A Chimney Cowl

Select your Cowl

There are many different types of chimney cowls for the use with different types of chimneys. Stainless steel is a recommended material for its resistance to corrosion from rain. If the installation is only going to cap a single flue, we recommend a cowl that slides on. This type of cowl may at most need you to tighten some bolts to help secure it. If you have purchased a round tile or steel flue, an inside mount cowl with brackets that will push down into the flue will be best. If you have multiple flues however, you may need a chimney cowl that connects to the outside of your chimney.

Access the Roof

If you can reach the chimney from you rooftop, installing the chimney cap should be a fairly easy process. If it is not, attempt to reach the chimney using a safe ladder from ground level.

Install the Chimney Cowl

Inside mount cowl on a tile flue, you should caulk it into place with silicone sealant to the chimney. If you are using an inside mount chimney cowl on a metal flue though, do not use the sealant, this is because metal chimney flues get too hot and can damage the sealant. A chimney cowl that attaches to the chimney, you should plan the spacing of the anchors before connecting the chimney cap. It is recommended you use at least 1 anchor on each side of the chimney you are installing the cowl on. The anchors should be at least 1 foot apart. Slide the chimney cowl onto the chimney and straighten it using the level. The manufacturer of the cowl may provide adhesive to hold the cowl, follow all the provided directions for the application of the adhesive. If the chimney cowl must be screwed on, hold the cowl tight against the masonry and drill through both. Afterwards, sink the masonry anchor.

Insert the first screw into the bracket and tighten it into place. Drill the next hole on the same side as the first. Use the level and work around the perimeter of the chimney, tightening consecutive screws as you proceed.